I wanted to let you know that I have added little "Pin It" tags to all of the images on this blog (I used this tutorial). If you hold your mouse over the upper-left hand corner you will see them. I appreciate it so much when you pin my free stuff on pinterest and link my posts on Facebook. This blog is only here because of you, my readers, so thank you so much for sending your friends my way!
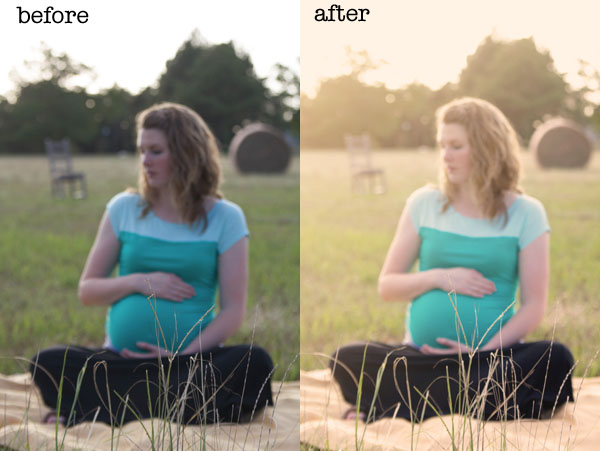
I had so much fun editing this maternity shoot, and I wanted to post a Photoshop/PSE tutorial and free action for this editing technique. Thanks to my Facebook reader Eulanda, this new tutorial/action has a perfect name: CoffeeShop Sun-Kissed Butter.
Today I am going to show you how to do this edit in PSE and Photoshop, and on my next post I will post the free action. I hope you have fun playing! BTW, I made some chalkboard tags (you can see one in my ad above) and I will put them up here for free download this week.
If you edit an image using this tutorial or action, I would love to see your before/afters posted on my Facebook page. I love looking at your work and I am happy to answer your questions or listen to your requests. :-)
CoffeeShop Sun-Kissed Butter Action-UnWrapped Tutorial:
1. Open your image. This is my friend K, and she had her little boy just a few weeks ago!
2. To brighten the image, add a levels adjustment layer with no adjustments and put the blending mode in screen. After looking at the image with the adjustment layer added, I decided to move the shadows (left) slider in a bit to add some contrast to the darks.
3. I wanted to warm the image up some, so I added a Photo Filter adjustment layer (Warming Filter 85, 25%, Preserve Luminosity checked).
4. To add some directional light, create a new layer on top filled with black and put it in screen blending mode. You won't see any difference in your image yet.
5. Make your background color black and your foreground color a nice peachy/orange (I used #f3c77a).
6. Click G to get your gradient tool and make sure you select the orange foreground to black background option.
7. As you can see I have the gradient tool selected (1) and the gradient is orange to black (2), the first gradient is selected (3) and the mode is normal and opacity is 100% (4).
8. Now we will add some lighting "magic". Click on the top area where you want the light to start and drag down where you want the light to end. As you can see in the screenshot above, I had the gradient tool selected and started at the top upper-left corner and dragged it down diagonally across her body. Play around with the tool until you get a nice glow.
You can adjust the opacity of this layer, but I kept it at 100% because I like some haze.
9. I wanted to add more color, so I added a color fill adjustment layer on top (same orange as above), and put it in multiply blending mode at 19% opacity. Then I used a soft low opacity black brush on the layer mask to remove some of the color off her skin and clothing.
I am really pleased with this edit and I found it looks beautiful on so many images. I hope you have fun playing along with me! I will post the free action in my next post.
I love when you post your before/after samples on my Facebook page!
Do you want to download my favorite CoffeeShop Actions or Design Elements in one convenient zipped file AND help support this blog? Just click here for my action pack or here for a download of some of my most popular design elements, storyboards, and textures.
WebRep
currentVote
noRating
noWeight


No comments:
Post a Comment