Showing posts with label Tutorial. Show all posts

Saturday, August 3, 2013

Photography Tutorial: Late Afternoon Backlighting and LR4 Presets

type="html">I had the pleasure of doing a maternity photography shoot for my friends K&D who are expecting a little boy any day now.

We meet in a small field during late afternoon (and almost 100 F!).    I wanted to get some photos of this adorable couple backlighted by the setting sun.  I also took some with other outdoor natural lighting (facing sun, open shade) which I will highlight in another post.


This is the SOOC image (straight-out-of-the-camera).  I shot this in manual mode in RAW and had my camera set to 400 ISO (Canon EOS Rebel T2i) using the Tamron AF 28-75mm f/2.8 lens.  Since I am not a professional photographer I can get away with my Rebel.  :-)  I often fantasize about getting a "real" camera, but I decided I prefer a lighter, smaller camera body and some extra money in my pocket.  Some of the perks of being a serious amateur and not a pro.  :-)

I wanted the background to be "soft" so I set my aperture to f/4.5 (the lower the number the softer the background) and then set my exposure to lighten their faces somewhat without completely blowing out the background and still allowing a ring of light around their heads (1/1000 sec in this case).  A trick to set the exposure on a face in extreme lighting situations like this is set your zoom and then walk forward until their face fills the screen, get a reading, adjust your exposure setting to expose the skin properly, and walk backwards to take your photo.

This type of image is best shot in manual mode as you don't want the camera picking your exposure settings.  At times I might want a silhouette effect, so I would expose for the background light.  Other times I might want to highlight their expressions so I would expose for their faces.  For this image I wanted to see their expressions but also silhouette that beautiful belly, so I tried to work out a happy balance.  I usually set my ISO and aperture and then adjust the exposure.

If you are new to shooting in manual mode, your best bet is to try several different exposures and then pick your favorite later when you start editing.  And remember, practice makes perfect in photography.  You can read books and go to classes as much as you want, but unless you get out there and use your camera you won't feel comfortable shooting manual and getting that perfect-for-you shot.

After I got home I decided to run some Pretty Presets in LR4 on the image.  I wanted to show you how many different edits you can do on this one simple image using presets.  I will also show some edits in Photoshop/PSE using my own actions tomorrow.

I also wanted to mention that some enhancements are more lovely on screen, others look better in print. And I would always keep a clean edit on hand because these "arty" effects can be very trendy and what you love today you might hate tomorrow.  I provided my friends a simple clean edit and then a few fun ones so they could choose their own favorite.

I ran the presets and did not other adjustments on these images.  Which one is your personal favorite?


 1.  Pretty Presets "Backlit RAW"preset from the Spring Color Flare and Haze set.


2.  Pretty Presets "Fine Art Film" preset from the Fine Art Film Collection.

3.  Pretty Presets "Bejeweled V1" from the Fine Arts Film collection.

4.  Pretty Presets "Sunflare Right + Up Light" preset from the Spring Color Flare and Haze set.

I was really excited to do this shoot, especially since I haven't done any maternity photography in almost four years.  I felt comfortable with my camera but I did realize I had deficits in hand/feet placement and best body positions.  I need to do another shoot so I can apply what I learned from this one.  I just appreciate that K & D let me practice on them!

Do you want to download my favorite CoffeeShop Actions or Design Elements in one convenient zipped file AND help support this blog? Just click here for my action pack or here for a download of some of my most popular design elements, storyboards, and textures.

View the original article here

CoffeeShop Adding Rays of Light UnWrapped Tutorial and Action: Part 1!

type="html">

If you follow my blog (and I hope you do!), you might have noticed I have been obsessed with light in my photography lately.  I love capturing it in-camera, but it is also so much fun to add during post-processing.

I mentioned I would show you how to grab and enhance rays of light in your images when I posted the Mellow Yellow Sunlight action.   Today in Part 1 of the Rays of Light tutorial, I will show you one way I enhance the light in my images in the post-processing step.  This tutorial will not work in PSE, but I will post the free action that does work in both programs in my next post.  :-)

For this enhancement you must have an image with some light peeking through something. You want to add rays that would be possible in that situation but were not captured in-camera.

CoffeeShop Rays of Light Tutorial (Photoshop only, PSE/Photoshop Action):


1. Select an image that would be enhanced by sun rays.  Your image should have sun peeking through either trees, mountains, buildings, etc.  This image already has some in-camera light rays and I will add more.

Note that I always overdo my edits in my tutorials so you can see the differences in the before/afters on these small web images.  When you do your own edit you will probably want to make this enhancement more natural/subtle.


2.  Photoshop Users Only!  Click on the Channels tab in your editing pane and then click on the little circle on the bottom (see screenshot above).  This allows Photoshop to select your highlights, which is the bright light in this image.


3.  Click back on the Layers tab and then Ctrl-J to put the highlights in their own layer.


4.  Put Layer 1 in Screen blending mode.  So far you won't see a difference, but don't worry!


5.  Go to Filter, Blur, Radial Blur (settings: 100 Amount, Zoom, Good).  I  drag the center of my blur to the brightest area on my image.  As you can see I had to eyeball the placement.  (Note: You can also use Motion Blur.)


6.  Click OK and you will see lovely sun rays.


7.  You can Ctrl-J this layer to make the effect more pronounced.


8.  When you are happy with the amount of light, merge the light ray layers.


9.  If you want to soften the effect and make the rays look more realistic, Gaussian blur the light.  You can also adjust the opacity of the layer to make them more subtle.


10. I usually like to add some color and warmth to the light rays.  Group a Color Fill adjustment layer set in Color Mode to the light ray layer and adjust the color and opacity to taste.  I used a golden yellow for this edit.

I also usually add a levels adjustment layer just over the background to adjust the color and contrast of the rest of the image.

I hope you enjoyed this little tutorial. Tomorrow in Part 2 of this tutorial I will post the free action that does all of the work for you and runs in both Photoshop AND PSE!  

Do you want to download my favorite CoffeeShop Actions or Design Elements in one convenient zipped file AND help support this blog? Just click here for my action pack or here for a download of some of my most popular design elements, storyboards, and textures.

View the original article here

CoffeeShop MoonLit Fairy Dust Tutorial and Action, Part 1!

type="html">

I wanted to mention that my maternity shoot yesterday was incredible.  I haven't shot one in years so it was outside of my comfort zone, but I know my camera, understand light pretty well, and had the perfect couple to photograph.  There is nothing like photographing a young couple in love, expecting their first child.

And they were so patient, even though it was late afternoon and close to 100 degrees in the sun.  I will post some of my pics hopefully by this weekend.  I came home so excited.  I had forgotten the thrill of a great photo shoot.  I have to start doing more so I can grow as a photographer.

Unfortunately I woke up in the middle of the night with a sore throat that felt as though I were swallowing razor blades.  We went to Galveston this weekend and the pool was pretty icky due to all of the people, so I might have picked up a bug.  I wasn't in close contact with my couple (we drove our own cars and we were outside in the fresh air), so thankfully they should be fine.

Today I am going to show you one method to create a beautiful moonlit fairy dust image.  I used a wonderful SOOC image from Becky on this tutorial/action.  This is a really fun edit and I hope you enjoy playing.

This tutorial/action is for intermediate to advanced users of Photoshop/PSE. You must be able to paint on layer masks (tutorial here) and add textures.  Today is part 1 of the tutorial, the rest is posted here.

CoffeeShop MoonLit Fairy Dust Tutorial, Part 1 (Part 2 here!):


This image is perfect for this effect/action.  Notice it is low in contrast (taken in open shade) and the background is almost equally dark. You don't want areas of dappled light in the background.  However, there are some things you can do to optimize your image for this action/effect if your lighting is not idea.


For images that have bright backgrounds:  Open your image (this one was already perfect, but I will go ahead and show you how you would do this on your own images) add a levels adjustment layer and move the gamma (middle) slide to the right and the right side Output Levels slide to the left until your image has low contrast and is darker.  Don't overdo this step!  You can also use the burn tool to darken areas that are still too light.


Use the layer mask to paint out your subject (this keeps the background dark) and then flatten your image.  Now you are ready to start the action.


Run the CoffeeShop MoonLit Fairy Dust action on your image. Your image will probably look horrible at the conclusion of the action run.  This is normal!   You will want to paint out your subject from most of the layers.  I am going to show you a quick method that works in both PSE and Photoshop.

The first thing I do is adjust the darken layer's opacity to taste.  I want the background dark but not completely black.


Select a 50% hard black brush at 50% opacity and click on the top layer mask (Color Fill 1).


Paint out your subject.  If you want to see where you are painting as seen in this image, hold alt/option and shift and click on the layer mask. Do the same to remove the red paint effect.

I am using a 50% opacity brush because I don't want her skin-tone to be daylight warm;  I want it to be somewhat cool as if it is night.  As you can see I did a quick and dirty job of painting on her face/body and need to go back over the edges.


My edges are now cleaned up.  It is best to do a really detailed job on this step. You can always tweak it later, but I plan on copying this layer mask to the other layers so I want it to be as perfect as possible.


If you have Photoshop you can simply hold alt and drag your layer masks on the other white layers to replace them.  However, PSE users don't have that luxury (at least I haven't figured it out yet!) so I found a nifty go-around. You don't have to do this step if you would rather paint on each layer individually.  ;-)

Hold down alt or option and then click on the layer mask.  You should see your image turn white and gray.  Then Select, All and Edit, Copy.  Click on the next white layer mask down to select it and Edit, Paste.  Continue to click on the white layer masks and Edit, Paste until all of the layer masks are filled.


As you can see, all white layer masks have the same gray painted area.  Now I can fine-tune the layers and adjust their opacities to taste, if needed. Sometimes I use a low opacity brush to remove or add even more of the layer's effects.


Now we want to add the fairy glow.  Click to select the black mask on the Fairy Light layer.


Use a large soft white brush at 30% opacity or so, and brush over the area you want to lightened.  You might want to brush it 2 or 3 times. Once it is perfect you are ready to add fairy dust!  That part of the tutorial will continue here.

I hope you had fun learning one way to edit fairy dust fantasy images!  I will also write an Action UnWrapped tutorial on this edit for those of you who want to see what is going on "under the hood" when the action runs.

Download the free CoffeeShop Moonlit Fairy Dust action/brush/texture. You can also download it here.

Do you want to download my favorite CoffeeShop Actions or Design Elements in one convenient zipped file AND help support this blog? Just click here for my action pack or here for a download of some of my most popular design elements, storyboards, and textures. 

For complete info on installing all of my actions, click here.


View the original article here

CoffeeShop Sun-Kissed Butter Action UnWrapped Tutorial!

type="html">

I wanted to let you know that I have added little "Pin It" tags to all of the images on this blog (I used this tutorial).  If you hold your mouse over the upper-left hand corner you will see them.  I appreciate it so much when you pin my free stuff on pinterest and link my posts on Facebook.  This blog is only here because of you, my readers, so thank you so much for sending your friends my way!

I had so much fun editing this maternity shoot, and I wanted to post a Photoshop/PSE tutorial and free action for this editing technique.  Thanks to my Facebook reader Eulanda,  this new tutorial/action has a perfect name: CoffeeShop Sun-Kissed Butter.

Today I am going to show you how to do this edit in PSE and Photoshop, and on my next post I will post the free action.  I hope you have fun playing!  BTW, I made some chalkboard tags (you can see one in my ad above) and I will put them up here for free download this week.

If you edit an image using this tutorial or action, I would love to see your before/afters posted on my  Facebook page.  I love looking at your work and I am happy to answer your questions or listen to your requests.  :-)

CoffeeShop Sun-Kissed Butter Action-UnWrapped Tutorial (Click here to download the action):


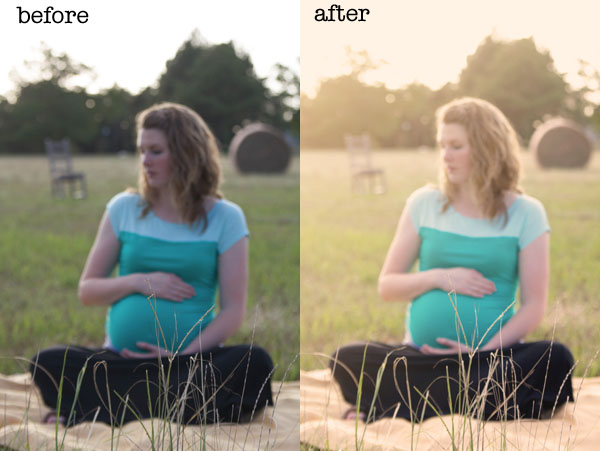
1.  Open your image.  This is my friend K, and she had her little boy just a few weeks ago!

2.  To brighten the image, add a levels adjustment layer with no adjustments and put the blending mode in screen.  After looking at the image with the adjustment layer added, I decided to move the shadows (left) slider in a bit to add some contrast to the darks.

3.  I wanted to warm the image up some, so I added a Photo Filter adjustment layer (Warming Filter 85, 25%, Preserve Luminosity checked).


4.  To add some directional light, create a new layer on top filled with black and put it in screen blending mode.  You won't see any difference in your image yet.


5.  Make your background color black and your foreground color a nice peachy/orange (I used #f3c77a).


6.  Click G to get your gradient tool and make sure you select the orange foreground to black background option.


7.  As you can see I have the gradient tool selected (1) and the gradient is orange to black (2), the first gradient is selected (3) and the mode is normal and opacity is 100% (4).


8. Now we will add some lighting "magic".  Click on the top area where you want the light to start and drag down where you want the light to end.  As you can see in the screenshot above, I had the gradient tool selected and started at the top upper-left corner and dragged it down diagonally across her body.  Play around with the tool until you get a nice glow.  

You can adjust the opacity of  this layer, but I kept it at 100% because I like some haze.


9.  I wanted to add more color, so I added a color fill adjustment layer on top (same orange as above), and put it in multiply blending mode at 19% opacity.  Then I used a soft low opacity black brush on the layer mask to remove some of the color off her skin and clothing.


I am really pleased with this edit and I found it looks beautiful on so many images.  I hope you have fun playing along with me!  I will post the free action in my next post.

I love when you post your before/after samples on my Facebook page!

Do you want to download my favorite CoffeeShop Actions or Design Elements in one convenient zipped file AND help support this blog? Just click here for my action pack or here for a download of some of my most popular design elements, storyboards, and textures. 
WebRep
currentVote
noRating
noWeight

View the original article here

Sunday, July 28, 2013

Photography Tutorial: Late Afternoon Backlighting and LR4 Presets

type="html">I had the pleasure of doing a maternity photography shoot for my friends K&D who are expecting a little boy any day now.

We meet in a small field during late afternoon (and almost 100 F!).    I wanted to get some photos of this adorable couple backlighted by the setting sun.  I also took some with other outdoor natural lighting (facing sun, open shade) which I will highlight in another post.


This is the SOOC image (straight-out-of-the-camera).  I shot this in manual mode in RAW and had my camera set to 400 ISO (Canon EOS Rebel T2i) using the Tamron AF 28-75mm f/2.8 lens.  Since I am not a professional photographer I can get away with my Rebel.  :-)  I often fantasize about getting a "real" camera, but I decided I prefer a lighter, smaller camera body and some extra money in my pocket.  Some of the perks of being a serious amateur and not a pro.  :-)

I wanted the background to be "soft" so I set my aperture to f/4.5 (the lower the number the softer the background) and then set my exposure to lighten their faces somewhat without completely blowing out the background and still allowing a ring of light around their heads (1/1000 sec in this case).  A trick to set the exposure on a face in extreme lighting situations like this is set your zoom and then walk forward until their face fills the screen, get a reading, adjust your exposure setting to expose the skin properly, and walk backwards to take your photo.

This type of image is best shot in manual mode as you don't want the camera picking your exposure settings.  At times I might want a silhouette effect, so I would expose for the background light.  Other times I might want to highlight their expressions so I would expose for their faces.  For this image I wanted to see their expressions but also silhouette that beautiful belly, so I tried to work out a happy balance.  I usually set my ISO and aperture and then adjust the exposure.

If you are new to shooting in manual mode, your best bet is to try several different exposures and then pick your favorite later when you start editing.  And remember, practice makes perfect in photography.  You can read books and go to classes as much as you want, but unless you get out there and use your camera you won't feel comfortable shooting manual and getting that perfect-for-you shot.

After I got home I decided to run some Pretty Presets in LR4 on the image.  I wanted to show you how many different edits you can do on this one simple image using presets.  I will also show some edits in Photoshop/PSE using my own actions tomorrow.

I also wanted to mention that some enhancements are more lovely on screen, others look better in print. And I would always keep a clean edit on hand because these "arty" effects can be very trendy and what you love today you might hate tomorrow.  I provided my friends a simple clean edit and then a few fun ones so they could choose their own favorite.

I ran the presets and did not other adjustments on these images.  Which one is your personal favorite?


 1.  Pretty Presets "Backlit RAW"preset from the Spring Color Flare and Haze set.


2.  Pretty Presets "Fine Art Film" preset from the Fine Art Film Collection.

3.  Pretty Presets "Bejeweled V1" from the Fine Arts Film collection.

4.  Pretty Presets "Sunflare Right + Up Light" preset from the Spring Color Flare and Haze set.

I was really excited to do this shoot, especially since I haven't done any maternity photography in almost four years.  I felt comfortable with my camera but I did realize I had deficits in hand/feet placement and best body positions.  I need to do another shoot so I can apply what I learned from this one.  I just appreciate that K & D let me practice on them!

Do you want to download my favorite CoffeeShop Actions or Design Elements in one convenient zipped file AND help support this blog? Just click here for my action pack or here for a download of some of my most popular design elements, storyboards, and textures.

View the original article here