Tuesday, August 6, 2013

CoffeeShop 2 Minute Miracle Plus Photoshop/PSE Action!

type="html">

Bethany wrote me on my Facebook page and request a new version of 2 Minute Miracle with the levels adjustment and redness removal layer from Perfect Portrait.  Of course I was excited to oblige since I am always looking for new things to post on this blog that people actually need.  :-)

The beautiful image I used in this ad was photographed and donated by Caryn Prouty.

CoffeeShop 2 Minute Miracle Plus is the exact same action as 2 Minute Miracle, but with an additional two steps added.  There is a levels adjustment layer that allows you to adjust the color/contrast on the fly and there is also a redness removal layer where you can paint off skin redness with ease.  This action is perfect for those red-tinted skin baby images.


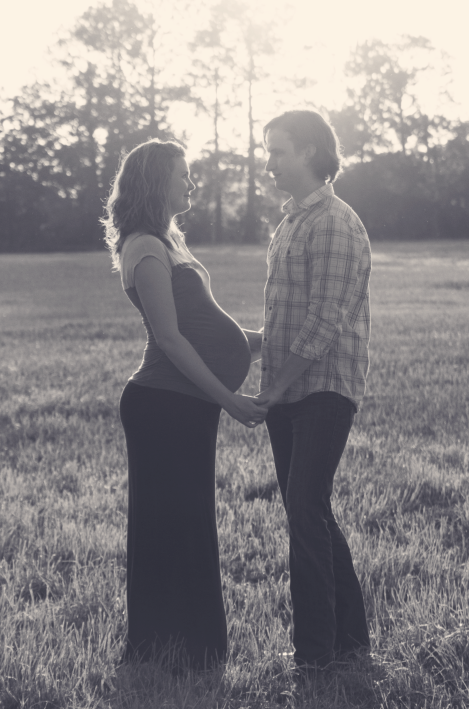
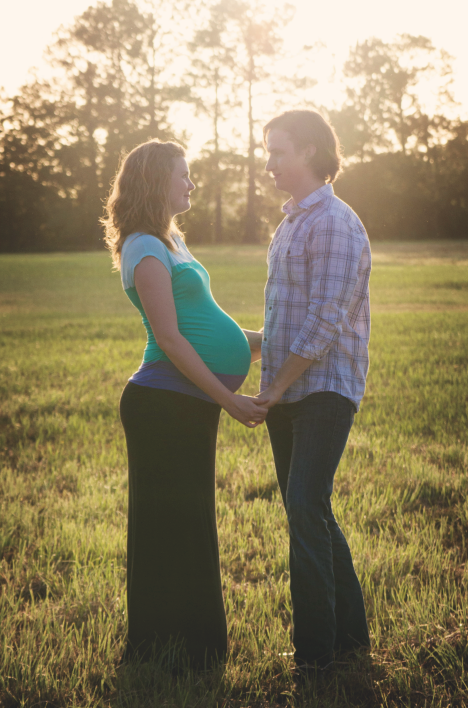
Here is a before/after from Beverley.

To use this action please read the tutorial on the 2 Minute Miracle original action and also the additional tips below.


When you start the action, a levels adjustment layer box will pop up and you can adjust color and contrast.  After the action finishes running you will see 6 new layers over your background.

Paint over the layer masks and adjust each layer's opacity to edit your image.

I hope this action will be a valuable additional to your Photoshop/PSE toolbox!

Download the free CoffeeShop 2 Minute Miracle Plus action.  You can also download it here.

Do you want to download my favorite CoffeeShop Actions or Design Elements in one convenient zipped file AND help support this blog? Just click here for my action pack or here for a download of some of my most popular design elements, storyboards, and textures.

For complete info on installing all of my actions, click here.

View the original article here

CoffeeShop Chalkboard 2: Photo Storyboard!

type="html">

Today I am posting a new photo template.  It is a png file so you can simply drag your images behind the frame and Ctrl-T them to fit.  The boys helped me set up a  photoshop to photograph the clothespins on the line.  Then I added a chalkboard texture and some frames.

This photo template/storyboard can be used as a website header, Facebook cover, on cards, or as a display for photos in your blogs/websites.  I hope you have fun playing with it!

BTW, the Kindle Fire HD is on sale again for less than $160!!!

Download the free CoffeeShop Chalkboards 2  Photo Template. You can also download it here.
This is not an action.  It will open in most photo editing programs. 

Do you want to download my favorite CoffeeShop Actions or Design Elements in one convenient zipped file AND help support this blog? Just click here for my action pack or here for a download of some of my most popular design elements, storyboards, and textures.

View the original article here

Time capsule SG Pro

Sorry, I could not read the content fromt this page.Sorry, I could not read the content fromt this page.

View the original article here

Sunday, August 4, 2013

Silvertone 1415

Sorry, I could not read the content fromt this page.Sorry, I could not read the content fromt this page.

View the original article here

Gibson ES-330T

Sorry, I could not read the content fromt this page.Sorry, I could not read the content fromt this page.

View the original article here

Silvertone 1413

Sorry, I could not read the content fromt this page.Sorry, I could not read the content fromt this page.

View the original article here

Original Mosrite Mark V The Ventures!

Sorry, I could not read the content fromt this page.Sorry, I could not read the content fromt this page.

View the original article here

Please Do NOT Refinish Guitars

Sorry, I could not read the content fromt this page.Sorry, I could not read the content fromt this page.

View the original article here

K & D Maternity Photo-shoot: My Favorite Image?

type="html">


As I mentioned earlier, I went out of my comfort zone and shot my first maternity photo-shoot (K & D) in over four years.  I love photography, but never claim to be a professional even though I sometimes play one on this blog.  ;-)   But I find doing a "real" photo-shoot every once in a while keeps me on my toes.

My friend and neighbor is having her baby any day, and I was lucky enough to get to photograph the excited parents a few weeks ago. It was very hot that afternoon, and she was such a trooper.  We shot up the road in a field in front of a small historic cemetery.  I was so excited to see the hay bales and couldn't wait to bring the boys out there, but an industrious farmer removed them the next day...

I personally love to photograph friends and family, and since I don't charge anything I feel relaxed and can really enjoy myself.  I figure if I get one decent image then the shoot was a success.  As a paid professional you can't say that to your clients.  ;-) And I also get permission to use the images on my blog. I get so excited to have new photos for my actions and tutorials.

We shot late afternoon and the lighting was beautiful. Because we shot into the sun, in open shade, and with back lighting, I shot the entire thing in manual mode.  I was really excited that I was able to do this so quickly and K even commented that I seemed to really know my camera.  Score!

The one issue I had was editing the images (I used Lightroom 4 and Pretty Presets).  I love artistic edits, but I also know many people prefer simple clean edits.  So I made sure to include the clean edits and threw in extra "arty" edits on the side.  I can never tell what people will like, and often they seem to prefer the images I think are my weakest.

I will post a few of my favorites this week and let you know how I shot/edited them (tutorials!). This image is one of my favorites and I am really curious what K and D (the future parents) will think about it.   I hope they find at least one image on the disc they love.  This is one photo-shoot I can't repeat since their little boy is due any day.

I am so excited to see the little guy.  They mentioned I could do a newborn shoot, but I have to see if they will still want me to do it after I give them these images.  They might run away screaming!  ;-)

Do you want to download my favorite CoffeeShop Actions or Design Elements in one convenient zipped file AND help support this blog? Just click here for my action pack or here for a download of some of my most popular design elements, storyboards, and textures.

View the original article here

Saturday, August 3, 2013

{Friday Photo Bliss} and New Action Coming Out!!!

type="html">

Every Friday I like to post one image I took that week that makes me happy. Today I decided to break tradition and post one image that expresses why I make the boys wash their feet when we get home from the park.  Disgusting Duke Feet!!!  Sorry I shared this, but I wanted you to feel my pain.

This is why I am usually the only Mom at the park who has boys running around in their Crocs with socks. That way they can remove the disgusting socks when they get home and their feet are basically clean.  Am I too neurotic?

I also wanted to post a before/after using my newest action/tutorial I am releasing this weekend.  I haven't named this one yet.  It automatically adds a moody matte yellowish tint to the image and adjustable sunbeams.  Any name suggestions? This one is really cool and I have a nifty way to add the sunbeams that you are going to enjoy learning!


Do you want to download my favorite CoffeeShop Actions or Design Elements in one convenient zipped file AND help support this blog? Just click here for my action pack or here for a download of some of my most popular design elements, storyboards, and textures.

For complete info on installing all of my actions, click here.

View the original article here

Happy 4th of July!

type="html">It might be hot and dry here in Texas, but that is not keeping us from having a great summer. Look at all we did in the last two weeks in our great (big) state!

I hope everyone is enjoying this 4th of July (even if you don't live in the US). Spend some time with your loved ones and relax.  There is still a lot of summer ahead of us and it is a hot one.


Do you want to download my favorite CoffeeShop Actions or Design Elements in one convenient zipped file AND help support this blog? Just click here for my action pack or here for a download of some of my most popular design elements, storyboards, and textures.

For complete info on installing all of my actions, click here.

View the original article here

CoffeeShop Rays of Light Photoshop/PSE Action!

type="html">

Today I wanted to share my newest free action, CoffeeShop Rays of Light.  This action automatically enhances the light in your images.  I have a step-by-step CoffeeShop Rays of Light Action UnWrapped tutorial posted here if you want to learn how to do this without the action or are just curious what is happening "under the hood".

This action should be run on images that have light coming through objects like trees, mountains, and buildings.  It automatically selects the light in your image and you adjust the amount and color of the rays.  

CoffeeShop Rays of Light Action Tutorial:


Open your image.   This picture is perfect for this action since there is some sun peeking through tree branches.

Start the action.  The first prompt will ask you to add a radial blur effect to the light.  I keep the Amount to 100, Blur Method on Zoom, and the Quality on Good.  Simply drag the Blur Center to the brightest area, in this case the sun in the upper right-hand corner.


To make the rays look more realistic you might need to blur them.


I dialed up the Gaussian Blur to 27 in this image and I can really see a difference.  You can also blur this effect after the action finishes running if you wish.


These are the layers you will see after the action is finished.  The Adjust Contrast was renamed Adjust Color and Contrast in the final action.  :-)  You can adjust the opacity of the Light Rays layer to add a more subtle effect.


If you want to add some color to your light rays, turn on the top Light Ray Color layer and adjust the color and opacity to taste.


If you want to add more contrast you can click on the Adjust Color and Contrast layer (a levels adjustment layer) and adjust the sliders to add more contrast.


If you want a Matte-type of edit, slide the bottom-left black Output Levels adjustment slider to the right and slide the top-left shadow slider to the right.  See screenshot above to get an idea of settings.


You can also use this layer to add color.  I changed the RGB setting to Blue and added more blue to this image.  I love playing with the Blue/Red/Green sliders.  :-)

I hope you have fun playing with this action!  Download the free CoffeeShop Rays of Light Action. You can also download it here.

Do you want to download my favorite CoffeeShop Actions or Design Elements in one convenient zipped file AND help support this blog? Just click here for my action pack or here for a download of some of my most popular design elements, storyboards, and textures.

For complete info on installing all of my actions, click here.

View the original article here

Maternity Shoot Processed with CoffeeShop Actions

type="html">
New fan freebie posted on my Facebook page! If you aren't a fan of Facebook, don't worry; the fan freebies always eventually end up on my blog for free download.  :-)

Yesterday I posted a tutorial on one way I would photograph a back-lit maternity portrait and then showed you some edits with presets in LR4.  Today I wanted to post a few edits using my own actions in Photoshop/PSE.  Click on the link below the image to download the free action.

I ran the actions on the SOOC image and made no adjustments.   However, each action is completely adjustable, so if I had taken the time I could have customized the edit.  I was having so much fun playing with the actions but I tried to show some control by posting only some of my favorites edits. :-) The kids are both sick with summer colds so they were busy watching Garfield and Pink Panther (thank you Amazon Prime!) while Mommy got to play on the computer.

So do I prefer doing my "arty" edits with Lightroom or Photoshop/PSE?  It really depends. LR is usually faster but Photoshop/PSE allows more customization (and the use of textures).  I personally have to have both programs on my computer.  I use LR for my basic editing and some arty enhancements, but Photoshop/PSE for most of my "wall art", especially if I need precise masking and want to use textures/brushes.

Whether you use presets, actions, or custom editing; just get out there, shoot, and have fun!  And for goodness sake, print some of your art work and hang it up.  :-)


SOOC, no edit


Aphrodite


Aphrodite B&W


Moonlit Fairy Dust (with no fairy dust applied!)


Autumn Vintage


Sun Kissed


Velvet Ash


Velvet Truffle


Vintage Blush


Rosy Vintage


Peachy Glow


Aphrodite and Sun Kissed


Do you want to download my favorite CoffeeShop Actions or Design Elements in one convenient zipped file AND help support this blog? Just click here for my action pack or here for a download of some of my most popular design elements, storyboards, and textures.

For complete info on installing all of my actions, click here.


View the original article here

CoffeeShop Vintage Chalkboard Tags 1!

type="html">

I made these fun, digital chalkboard tags and wanted to share them with you today.  These are simple pngs with transparent backgrounds so you can use them in most editing programs.  Open them and add your own text.  These would look adorable on websites, storyboards, Facebook covers, website headers, greeting cards, etc.

I used a wonderful free-for-personal/commercial-use chalkboard texture as a background and I can't find the link anywhere...   If anyone finds them please link it in my comments.

I am looking for some chalkboard textures I can post here for free download that can be used however anyone likes (even commercially), and if any of you would be interested in sharing some please let me know in the comments!  You will get full credit in both my blog post and download.

The shapes are my own and some can be found here.  The vintage design elements are from my absolutely favorite graphic designs site, The Graphics Fairy.  And I used fonts from KevinandAmanda on the "ad".

I will post the CoffeeShop Sun-Kissed Butter Photoshop/PSE action download in my next post.

Download the free CoffeeShop Vintage Chalkboard Tags 1. You can also download them here.

Do you want to download my favorite CoffeeShop Actions or Design Elements in one convenient zipped file AND help support this blog? Just click here for my action pack or here for a download of some of my most popular design elements, storyboards, and textures.

View the original article here

Marketing Mall Free Digital Pricing Guide Download and 40% off Coupon Code!!!

type="html">Today I was sent a wonderful digital Pricing Guide freebie from Marketing Mall to share with my readers (download link below in post)!!!  Marketing Mall has all types of really great digital design products like Facebook covers, marketing sets, and blog boards.  Please go check them out and use the coupon code JULY40 to receive 40% off your purchase.  And thank you so much for checking out my sponsors.  They help me keep everything free here on my blog.  :-)

--------------

NEW Templates and an exclusive FREEBIE from MarketingMall

NEW  FACEBOOK TIMELINE COVERS
 
Premade templates are perfect to boost your photography business. They are professionally designed and a great time saver so you can focus on what you really love… taking fantastic Pictures!


You can download this 5x7" Photoshop template for free by clicking on the text link above! :)

  DISCOUNT CODE:


Use code JULY40 at checkout and enjoy a special 40% discount at my Etsy store.

*** LIKE our Facebook MarketingMall page for monthly Freebies ***


View the original article here